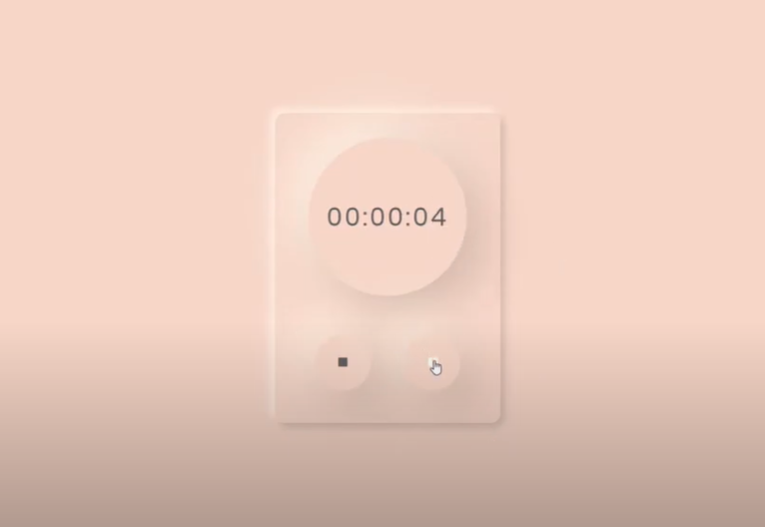
Create a stopwatch in Javascript
On April 14, 2020 by Sonahang RaiIn this blog we will be learning to make a stopwatch from the javascript and will be designing it in a neumorphic way. Lets get started with the tutorial.
Step 1: Creating our backbone ie: Our HTML
<!DOCTYPE html>
<html>
<head>
  <title>Timer</title>
  <link href="https://fonts.googleapis.com/css2?family=Poppins&display=swap" rel="stylesheet">
  <link href="http://maxcdn.bootstrapcdn.com/font-awesome/4.7.0/css/font-awesome.min.css" rel="stylesheet">
  <link rel="stylesheet" type="text/css" href="css/style.css">
</head>
<body>
<div id="stopwatch">
  <!-- [DISPLAY TIMER] -->
  <div id="sw-time">00:00:00</div>
  <div class="controls">
    <!-- [RESET BUTTON] -->
    <button value="Reset" id="sw-rst" disabled><i class="fa fa-stop"></i></button>
    <!-- [START/STOP BUTTON] -->
    <button value="Start" id="sw-go"><i class="fa fa-play"></i></button>
</div>
</div>
</body>
First lets create our html tags for our javascript stopwatch. You can create your own html elements as you prefer. I have used the google fonts cdn in this work. The font link tag is included in the head tag. Also I have used the fontawsome version4.7 for this work. I have made a whole container for stopwatch as giving id name as stopwatch. A div id “sw-time” for rendering the stopwatch data, “sw-rst as reset button and “sw-go” for start and pause stopwatch. Now lets go with our js code.
Step 2: Writing our javascript.
<script
  src="https://code.jquery.com/jquery-3.4.1.min.js"
  integrity="sha256-CSXorXvZcTkaix6Yvo6HppcZGetbYMGWSFlBw8HfCJo="
  crossorigin="anonymous"></script>
<script type="text/javascript">
  $('#sw-go').click(function(){
    $(this).find('i').toggleClass('fa-play fa-pause')
  });
  $('#sw-rst').click(function(){
    $('#sw-go').find('i').removeClass('fa-pause').addClass('fa-play')
  });


  var sw = {
    /* [INIT] */
    etime : null, // holds HTML time display
    erst : null, // holds HTML reset button
    ego : null, // holds HTML start/stop button
    timer : null, // timer object
    now : 0, // current timer
    init : function () {
      // Get HTML elements
      sw.etime = document.getElementById("sw-time");
      sw.erst = document.getElementById("sw-rst");
      sw.ego = document.getElementById("sw-go");

      // Attach listeners
      sw.erst.addEventListener("click", sw.reset);
      sw.erst.disabled = false;
      sw.ego.addEventListener("click", sw.start);
      sw.ego.disabled = false;
    },

    /* [ACTIONS] */
    tick : function () {
    // tick() : update display if stopwatch running

      // Calculate hours, mins, seconds
      sw.now++;
      var remain = sw.now;
      var hours = Math.floor(remain / 3600);
      remain -= hours * 3600;
      var mins = Math.floor(remain / 60);
      remain -= mins * 60;
      var secs = remain;

      // Update the display timer
      if (hours<10) { hours = "0" + hours; }
      if (mins<10) { mins = "0" + mins; }
      if (secs<10) { secs = "0" + secs; }
      sw.etime.innerHTML = hours + ":" + mins + ":" + secs;
    },

    start : function () {
    // start() : start the stopwatch

      sw.timer = setInterval(sw.tick, 1000);
      sw.ego.removeEventListener("click", sw.start);
      sw.ego.addEventListener("click", sw.stop);
    },

    stop  : function () {
    // stop() : stop the stopwatch

      clearInterval(sw.timer);
      sw.timer = null;
      sw.ego.removeEventListener("click", sw.stop);
      sw.ego.addEventListener("click", sw.start);
    },

    reset : function () {
    // reset() : reset the stopwatch

      // Stop if running
      if (sw.timer != null) { sw.stop(); }

      // Reset time
      sw.now = -1;
      sw.tick();
    }
  };

  window.addEventListener("load", sw.init);
</script>
You can use external js or internal any one. Here in js part I have included the cdn link of the jQuery. I have implemented jQuery for toggleing the play and pause icon. You can see those code in the begining of the second script tag. Below them are the js code for the stopwatch functionality. You can easily understand them if you are familier to javascript.
Step 3: Giving skin to our work ie: css
body{
	margin: 0;
	padding: 0;
	height: 100vh;
	background: #F4D4C9;
	display: flex;
	justify-content: center;
	align-items: center;
	font-family: 'Poppins', sans-serif;
    color: #615e5e;
}
div#stopwatch {
    border-radius: 12px;
    padding: 2%;
    border: 0;
	background: #F4D4C9;
	box-shadow:  5px 5px 10px #cfb4ab,
             -5px -5px 10px #fff4e7;
}
div#sw-time {
    height: 200px;
    width: 200px;
    margin: 0 auto;
    border-radius: 50%;
    background: #F4D4C9;
    box-shadow: 20px 20px 60px #cfb4ab, -20px -20px 60px #fff4e7;
    display: flex;
    justify-content: center;
    align-items: center;
    letter-spacing: 3px;
    font-size: 2rem;
}
button#sw-rst, button#sw-go {
	margin: 50px 20px 10px;
    width: 70px;
    height: 70px;
    border-radius: 50%;
    border: 0;
    background: #F4D4C9;
    box-shadow: 20px 20px 60px #cfb4ab, -20px -20px 60px #fff4e7;
    color: #615e5e;
    cursor: pointer;
    transition: 0.3s;
}
button#sw-rst:focus, button#sw-go:focus{
	outline: none;
}
button#sw-rst:hover, button#sw-go:hover{
	color: #fff;
}
Finally we can decor our work of HTML. Above is mine css and you can implement your own css and change the looks of your work on your own way. Get full git code here.
You can also watch my tutorial in youtube. Its easy when you learn by seeing.
Archives
Calendar
| S | M | T | W | T | F | S |
|---|---|---|---|---|---|---|
| 1 | 2 | 3 | 4 | 5 | 6 | |
| 7 | 8 | 9 | 10 | 11 | 12 | 13 |
| 14 | 15 | 16 | 17 | 18 | 19 | 20 |
| 21 | 22 | 23 | 24 | 25 | 26 | 27 |
| 28 | 29 | 30 | 31 | |||
Leave a Reply